


Showing posts with label fun with felt. Show all posts
Showing posts with label fun with felt. Show all posts
Tuesday, December 4, 2012
Crafty Christmas Ornament Exchange
I was excited to be a part of my Craft message board's ornament exchange again this year. Using the leftover felt and instructions from the wool candle mat that I made, I was able to whip up these cute snowmen ornaments. I love, love, love the way they turned out!

Friday, March 30, 2012
Decorate Your Own Superhero Cape Tutorial
For Chaos's 4th birthday, instead of a big party, we invited his two closest friends over for a "Superhero Playdate." One of the activities I had planned was to decorate their own superhero capes. These were super easy and inexpensive to make and the boys (and my girls too!) loved them. I thought I would share how I made them.

The first thing I needed was felt. I found that the felt by the yard at both Joanns and Hobby Lobby were too expensive for what I had in mind. As luck would have it, I stumbled upon these prepackaged felt yards at Michaels.

The brand is Creatology and each package contains one 36in x 36in square of felt. They had about a half dozen color options at my local store. The regular price was $3.99, but I went back with my 40% coupon several times during the week to get them for less. I was able to make 2 capes from each package.
The first thing I did was fold the felt in half, then in half again. By doing this, I was able to cut out both capes at once.

I drew a basic half-cape shape freehand. My cape is roughly 32 inches long which was a good size for both the 4 year olds at the playdate and Pinky (who is the tallest of the bunch at 49 inches).
Once you cut out and unfold your capes you will be left with this:

I needed a way to keep the capes attached and really didn't want to sew on velcro. I had some sticky back velcro dots and thought I would give them a try.

I was pleasantly surprised to find that they worked! I gave them a few tugs to make sure they wouldn't fall off, and while I don't expect them to last forever, they were perfect for the playdate. If you plan to use the cape for awhile I would definitely suggest adding a few stitches to secure your velcro.

To decorate the capes I cut out shapes from various colors of felt. I loved the adhesive backed felt, but could not find it in all the colors I wanted so I had to use regular felt as well. The craft felt was less expensive at 20 cents a sheet compared to 99 cents for the adhesive backed. However the adhesive felt was easier for the kids to use (we used tacky glue for the shapes cut from regular craft felt).

My superhero shapes were pretty random - various sizes of circles, stars, lightning bolts, flames and a crown.
On the day of the party I set out the capes, decorations and some tacky glue. The boys had a great time creating their own superhero identities.
While the glue and adhesive felt worked fine for the playdate (and are still holding up almost 2 weeks later) you will definitely want to either sew these on or use an iron on adhesive if you want the cape to last longer.

Once their capes were done these superheroes were ready to save the world!
Be sure to check back next week when I share more details from our Superhero Playdate!
Linking up to some of these great parties!


The first thing I needed was felt. I found that the felt by the yard at both Joanns and Hobby Lobby were too expensive for what I had in mind. As luck would have it, I stumbled upon these prepackaged felt yards at Michaels.

The brand is Creatology and each package contains one 36in x 36in square of felt. They had about a half dozen color options at my local store. The regular price was $3.99, but I went back with my 40% coupon several times during the week to get them for less. I was able to make 2 capes from each package.
The first thing I did was fold the felt in half, then in half again. By doing this, I was able to cut out both capes at once.

I drew a basic half-cape shape freehand. My cape is roughly 32 inches long which was a good size for both the 4 year olds at the playdate and Pinky (who is the tallest of the bunch at 49 inches).
Once you cut out and unfold your capes you will be left with this:

I needed a way to keep the capes attached and really didn't want to sew on velcro. I had some sticky back velcro dots
and thought I would give them a try.
I was pleasantly surprised to find that they worked! I gave them a few tugs to make sure they wouldn't fall off, and while I don't expect them to last forever, they were perfect for the playdate. If you plan to use the cape for awhile I would definitely suggest adding a few stitches to secure your velcro.

To decorate the capes I cut out shapes from various colors of felt. I loved the adhesive backed felt, but could not find it in all the colors I wanted so I had to use regular felt as well. The craft felt was less expensive at 20 cents a sheet compared to 99 cents for the adhesive backed. However the adhesive felt was easier for the kids to use (we used tacky glue for the shapes cut from regular craft felt).

My superhero shapes were pretty random - various sizes of circles, stars, lightning bolts, flames and a crown.
On the day of the party I set out the capes, decorations and some tacky glue. The boys had a great time creating their own superhero identities.
While the glue and adhesive felt worked fine for the playdate (and are still holding up almost 2 weeks later) you will definitely want to either sew these on or use an iron on adhesive if you want the cape to last longer.

Once their capes were done these superheroes were ready to save the world!
Be sure to check back next week when I share more details from our Superhero Playdate!
Linking up to some of these great parties!
Tuesday, January 3, 2012
Happy New Year!
As I sat here tonight, it occurred to me that this is the first time in 4 years that I haven't posted my "Year of Crafting" list on New Years Day. It's partly because my life since Sprout was born has been so darn busy and partly because I feel like Pinterest has taken away my need to make long lists! I much prefer the visual element anyway.
However, I do need to update my sidebar with the last of my completed craft projects for 2011. I'll admit, I didn't accomplish anywhere near what I set out to do. I did try some new things though and hope that the coming year will bring me more time to craft and more time to post about the fun stuff my kids and I have been up to.
Enough rambling though. Here is my final finished project for 2011 - a wool penny rug that I gave to my mom as a Christmas gift.

I bought the kit (pattern and wool felt) from One of the Flock on etsy. Can I rave about her customer service for a minute? I totally messed up right off the bat - totally my fault for trying to take a short cut - and ruined the white felt. I contacted her about buying a replacement and she told me not to worry about it. She had a replacement piece in the mail the next day, free of charge. How cool is that?

The pattern was easy to follow and I have to say that it came together much faster than I expected. I worked on it in short bursts and was finished in about 3 or 4 days. With dedicated time you could easily finish this in one day.

What surprised me the most is how much I really enjoyed the embroidery work. I had never tied a french knot before or really used any stitch other than a blanket stitch. I had fun learning some new stitches and hope to do some more embroidery work this coming year.
I want to wish all of you a wonderful, blessed New Year. Thank you, from the bottom of my heart, for taking the time to stop by my blog. I look forward to another fun year!
However, I do need to update my sidebar with the last of my completed craft projects for 2011. I'll admit, I didn't accomplish anywhere near what I set out to do. I did try some new things though and hope that the coming year will bring me more time to craft and more time to post about the fun stuff my kids and I have been up to.
Enough rambling though. Here is my final finished project for 2011 - a wool penny rug that I gave to my mom as a Christmas gift.

I bought the kit (pattern and wool felt) from One of the Flock on etsy. Can I rave about her customer service for a minute? I totally messed up right off the bat - totally my fault for trying to take a short cut - and ruined the white felt. I contacted her about buying a replacement and she told me not to worry about it. She had a replacement piece in the mail the next day, free of charge. How cool is that?

The pattern was easy to follow and I have to say that it came together much faster than I expected. I worked on it in short bursts and was finished in about 3 or 4 days. With dedicated time you could easily finish this in one day.

What surprised me the most is how much I really enjoyed the embroidery work. I had never tied a french knot before or really used any stitch other than a blanket stitch. I had fun learning some new stitches and hope to do some more embroidery work this coming year.
I want to wish all of you a wonderful, blessed New Year. Thank you, from the bottom of my heart, for taking the time to stop by my blog. I look forward to another fun year!
Friday, December 9, 2011
Crafty Christmas Ornament Exchange
For the second year in a row I participated in a crafty ornament exchange on a message board that I frequent.
Here's the adorable ornament that I received. His body is made of a light bulb!

This is the ornament that I sent to my secret draw:

It's a felt ornament that I embroidered and jeweled. I'm pretty happy with how it turned out. Next time I'll add colored crystals though instead of clear. I think that would make it pop a bit more. The tutorial is from here at BHG.
Here's the adorable ornament that I received. His body is made of a light bulb!

This is the ornament that I sent to my secret draw:

It's a felt ornament that I embroidered and jeweled. I'm pretty happy with how it turned out. Next time I'll add colored crystals though instead of clear. I think that would make it pop a bit more. The tutorial is from here at BHG.
Saturday, March 5, 2011
Dr. Seuss, Day 7
For the final day of our week long celebration we read, in my opinion, the most well loved Dr. Seuss book there is - Green Eggs and Ham.

Now, I'm sure the MOST logical activity to pair with this book is eating green eggs and ham, but, since my kids won't touch normal colored eggs and ham, I had to get creative...

FELT green eggs and ham!
The kids had a blast pretending to be Sam-I-Am and reenacting the book.
If your kids are a bit more adventurous when it comes to eating, you may want to check out My Delicious Ambiguity for a great round up of Seuss-inspired foods.
Whew! What a week. I hope you had as much fun as we did. Be sure to check back tomorrow for our recap and a few activities that we ran out of time to do.
If you missed any of our other posts this week, click the button below to see them all!


Now, I'm sure the MOST logical activity to pair with this book is eating green eggs and ham, but, since my kids won't touch normal colored eggs and ham, I had to get creative...

FELT green eggs and ham!
The kids had a blast pretending to be Sam-I-Am and reenacting the book.
If your kids are a bit more adventurous when it comes to eating, you may want to check out My Delicious Ambiguity for a great round up of Seuss-inspired foods.
Whew! What a week. I hope you had as much fun as we did. Be sure to check back tomorrow for our recap and a few activities that we ran out of time to do.
If you missed any of our other posts this week, click the button below to see them all!
Wednesday, March 2, 2011
Dr Seuss Week, Day 4
I can't believe the week is halfway over already! Don't worry, we still have some really fun things planned for the days ahead!
Today we read two more Dr. Seuss classics - And to Think That I Saw it on Mulberry Street and One Fish Two Fish Red Fish Blue Fish.

We started with Mulberry Street. After reading the book the kids made up their own stories about what THEY may have seen. Pinky really enjoyed this activity. Here is her picture and story (the printable is from Chalk Talk: A Kindergarten Blog).

"Sprout, Chaos, and Mommy holding hands with a bird. The bird is holding hands with the car. A big storm is headed to our house, the highway and Shop-O-Rama."
Next we read One Fish Two Fish Red Fish Blue Fish (I think my tongue needs to be in a splint for the next week to recover from all that tongue twisting rhyming!). We read the story at snack time, so naturally we had to have Rainbow Goldfish to eat! I gave the kids a few math sheets to "play with their food" and they were so excited (since I'm usually telling them to STOP playing with their food).
Pinky loved the fishbowl addition sheet (also from Chalk Talk).

Chaos loved the graph from What the Teacher Wants Dr. Seuss Unit. I colored the words at the bottom of the graph so he could tell at a glance where the fish went. He loved sorting by color.

After snack, I gave Pinky and Chaos each a felt board I made (SO simple using just a sheet of felt glued to cardboard). I cut out lots of fish and underwater items for the boards. These were such a BIG hit that I may make a few more with different themes too.

Finally, we played a rhyming game before bed. (I'm so sorry, but I can't remember where I found these printables - if anyone knows, please email or comment so I can give credit). We started with all of the cards face up and picked pairs that rhymed. After a few rounds, Pinky decided to turn them over and play a memory style rhyme/match game to make it a bit harder.

Be sure to check in tomorrow for an activity that I've been looking forward to all week!
If you missed any of the posts this week, just click on the button below to get caught up!
Today we read two more Dr. Seuss classics - And to Think That I Saw it on Mulberry Street and One Fish Two Fish Red Fish Blue Fish.

We started with Mulberry Street. After reading the book the kids made up their own stories about what THEY may have seen. Pinky really enjoyed this activity. Here is her picture and story (the printable is from Chalk Talk: A Kindergarten Blog).

"Sprout, Chaos, and Mommy holding hands with a bird. The bird is holding hands with the car. A big storm is headed to our house, the highway and Shop-O-Rama."
Next we read One Fish Two Fish Red Fish Blue Fish (I think my tongue needs to be in a splint for the next week to recover from all that tongue twisting rhyming!). We read the story at snack time, so naturally we had to have Rainbow Goldfish to eat! I gave the kids a few math sheets to "play with their food" and they were so excited (since I'm usually telling them to STOP playing with their food).
Pinky loved the fishbowl addition sheet (also from Chalk Talk).

Chaos loved the graph from What the Teacher Wants Dr. Seuss Unit. I colored the words at the bottom of the graph so he could tell at a glance where the fish went. He loved sorting by color.

After snack, I gave Pinky and Chaos each a felt board I made (SO simple using just a sheet of felt glued to cardboard). I cut out lots of fish and underwater items for the boards. These were such a BIG hit that I may make a few more with different themes too.

Finally, we played a rhyming game before bed. (I'm so sorry, but I can't remember where I found these printables - if anyone knows, please email or comment so I can give credit). We started with all of the cards face up and picked pairs that rhymed. After a few rounds, Pinky decided to turn them over and play a memory style rhyme/match game to make it a bit harder.

Be sure to check in tomorrow for an activity that I've been looking forward to all week!
If you missed any of the posts this week, just click on the button below to get caught up!
Sunday, February 27, 2011
Dr Seuss Week Begins!
If you couldn't guess by the (very obvious) hint in my last post, we have a whole week planned around Dr. Seuss!! I am so excited. I've decided to post each day this week and recap all of the books and activities on my "What We Did this Week" post on Sunday to avoid having the longest post ever at the end of the week.

To get started, I printed off lots of coloring and activity pages from www.seussville.com and made both Pinky and Chaos their own activity books to go along with the books we plan to read.

And if you're going to finish mazes and dot to dots, you MUST have a Thing 1 and Thing 2 pencil (tutorial here on Skip To My Lou). I could not find fur for the hair, but I think the blue felt works just as well. These were a little too hard for the kids to make, but I sure had a good time with it.

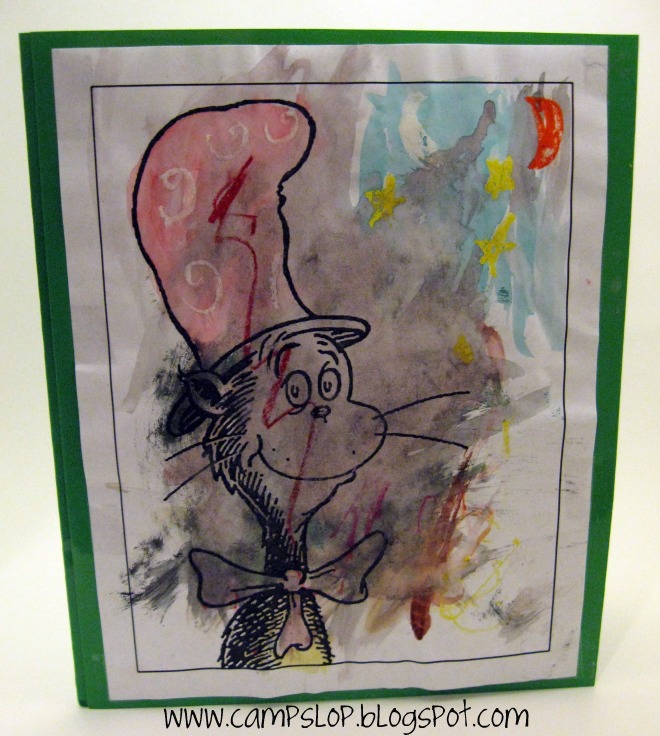
The first book we read was The Cat in the Hat Comes Back. After reading it, and talking all about who Dr. Seuss was and why we are celebrating him this week, we did our first art project. Using a free print out from Art Projects for Kids, I had the kids do a water color resist painting. First, they colored the cat's hat with oil pastels, then painted over it with watercolor paints.


When the paintings were dried, I taped them to the front of their activity books.


After we finished our paintings, we played a hat game with Wild One. I simply chose a bunch of different hats from our dress up trunk, and we all took turns wearing them and laughing at how silly we looked! Wild One is really into trying on hats and shoes these days.


At bedtime, we read Did I Ever Tell You How Lucky You Are and made a list of all the things we are thankful for (there is a printout for this at www.seussville.com under activities).
In their own words:
Chaos is thankful for: himself, books, Sissy (Pinky), Momma, and pencils
Pinky is thankful for: her eyes, Taylor (one of our cats), Care Bear, Mom, Dad, her pencils, her pencil holder, Chaos and Wild One
The kids are really excited to find out what book we're reading tomorrow.
I've added a button to my sidebar and below so you won't miss any of our activities this week! Be sure to check back tomorrow (and every day this week) for more Dr. Seuss fun!

To get started, I printed off lots of coloring and activity pages from www.seussville.com and made both Pinky and Chaos their own activity books to go along with the books we plan to read.

And if you're going to finish mazes and dot to dots, you MUST have a Thing 1 and Thing 2 pencil (tutorial here on Skip To My Lou). I could not find fur for the hair, but I think the blue felt works just as well. These were a little too hard for the kids to make, but I sure had a good time with it.

The first book we read was The Cat in the Hat Comes Back. After reading it, and talking all about who Dr. Seuss was and why we are celebrating him this week, we did our first art project. Using a free print out from Art Projects for Kids, I had the kids do a water color resist painting. First, they colored the cat's hat with oil pastels, then painted over it with watercolor paints.


When the paintings were dried, I taped them to the front of their activity books.

After we finished our paintings, we played a hat game with Wild One. I simply chose a bunch of different hats from our dress up trunk, and we all took turns wearing them and laughing at how silly we looked! Wild One is really into trying on hats and shoes these days.


At bedtime, we read Did I Ever Tell You How Lucky You Are and made a list of all the things we are thankful for (there is a printout for this at www.seussville.com under activities).
In their own words:
Chaos is thankful for: himself, books, Sissy (Pinky), Momma, and pencils
Pinky is thankful for: her eyes, Taylor (one of our cats), Care Bear, Mom, Dad, her pencils, her pencil holder, Chaos and Wild One
The kids are really excited to find out what book we're reading tomorrow.
I've added a button to my sidebar and below so you won't miss any of our activities this week! Be sure to check back tomorrow (and every day this week) for more Dr. Seuss fun!
Do you have any Dr. Seuss activities planned this week? I'd love to see them!
Thursday, February 24, 2011
Pencil Holders!
Pinky has really enjoyed writing and drawing in her journal lately. She has a ton of pencils that she has collected and needed a better place to store them. I thought it was a perfect opportunity for a throwback craft I loved as a kid - tin can pencil holders!

I can not believe how much Pinky and Chaos enjoyed this craft (I guess I should since I loved it just as much when I was a kid). We covered the cans in felt, and then I let the kids go to town gluing on embellishments - pompoms, flowers, ribbon, sequins, buttons, etc. Chaos surprised me by being very involved in this craft. He loved the gluing (something he usually avoids) and in general just had a great time.

Here are the pencil holders in their rooms - with paper and journal nearby just in case they feel inspired to write!


Linking to:


I can not believe how much Pinky and Chaos enjoyed this craft (I guess I should since I loved it just as much when I was a kid). We covered the cans in felt, and then I let the kids go to town gluing on embellishments - pompoms, flowers, ribbon, sequins, buttons, etc. Chaos surprised me by being very involved in this craft. He loved the gluing (something he usually avoids) and in general just had a great time.

Here are the pencil holders in their rooms - with paper and journal nearby just in case they feel inspired to write!


Linking to:
Sunday, December 12, 2010
Felt Christmas Banner
Pinky brought home this adorable felt Christmas banner from Sunday School last week. I think it would be simple to recreate at home. The shapes are cut from felt and decorated with glitter glue, then glued on to the white felt background (I cut off her name at the bottom of the banner in this picture). We have this hanging on our front door


Friday, December 10, 2010
Felt and Fabric Christmas Ornaments
I found this tutorial at A Spoonful of Sugar. I used fabric scraps leftover from the busy bags I made this summer. I know the fabric isn't traditionally Christmas, but I love the bright fun colors. I couldn't resist using it!
I made one for each of the older kids to hang on the trees in their bedrooms. I may make one for Wild One too if time allows.

Pinky's heart

Chaos's star (he's using it as his tree topper)
I made one for each of the older kids to hang on the trees in their bedrooms. I may make one for Wild One too if time allows.

Pinky's heart

Chaos's star (he's using it as his tree topper)
Subscribe to:
Posts (Atom)
